Use case
Get AWS Pricing Alerts on Slack
- Dhruv Bundheliya
Monitor your AWS account daily base pricing on your Slack account or any other account.
AWS is a great service provider (tool) for businesses and individuals. But one major drawback of AWS can be stated: “If you do not care about your account, then AWS will not care about your pocket”. That is why we need to track the daily base cost of our AWS account.
Here’s how to get your AWS account daily base cost on your Slack account practically:
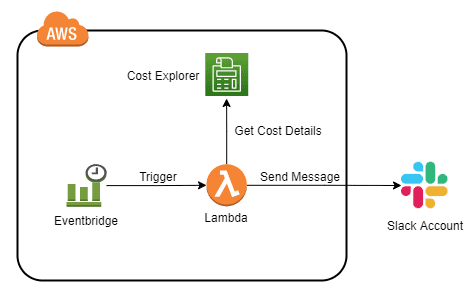
AWS provides the Python library to automate your tasks, so you can use it to track the AWS cost. As per the diagram below, you can make Lambda automation to get the cost details from Cost Explorer and send them to slack.
What is Lambda?
AWS Lambda is a serverless compute service that lets you run code without provisioning or managing servers, creating workload-aware cluster scaling logic, maintaining event integrations, or managing runtimes.
Step 1:
- Create the Lambda function in any region (wherever you want). Increase Lambda timeout to 1 minute.
- Lambda requires Cost Explorer Read-Only access so that you can add its Read-Only policy to Lambda’s IAM Role.
- AWS does not provide Cost Explorer Read-Only policy, so we need to create a custom policy.
- Attach the below
- custom policy in the Lambda role.
					  {
     “Version”: “2012-10-17”,
     “Statement”: [
    {
     “Sid”: “VisualEditor0”,
     “Effect”: “Allow”,
     “Action”: [

            “ce:GetCostAndUsageWithResources”,
            “ce:GetCostAndUsage”
         ],
        “Resource”: “*”
         }
      ]   }
Step 2:
- Lambda requires the external Python library to run code. You can download the external library from this link and attach it to the Lambda layer.
- Copy the below Python code in your Lambda function.
- Change to two-part in the above code.
- Enter the Slack webhook URL in line no. 8
- Enter the AWS account ID in line no. 14. (If you have multiple accounts, insert all account numbers in the list but make sure they are all registered in one organization and Lambda is in the organization’s root account. Otherwise, insert only the current account ID.)
					import json

import boto3

import requests from

datetime import datetime, timedelta

CLIENT = boto3.client(‘ce’)

SLACK_WEBHOOK_URL = ” # Enter the slack webhook url.

def lambda_handler(event, context):

                            START_DATE = (datetime.now() –

timedelta(days=2)).strftime(‘%Y-%m-%d’)

                            END_DATE = (datetime.now() –

timedelta(days=1)).strftime(‘%Y-%m-%d’)

AWS_ACCOUNT_ID = [”] # Enter your aws account id. If you have multiple accounts put all account ids.

for account_id in AWS_ACCOUNT_ID: COST = CLIENT.get_cost_and_usage( TimePeriod = {‘Start’: START_DATE, ‘End’:

END_DATE},

            Granularity = ‘DAILY’,

             Metrics = [‘UnblendedCost’],

             Filter = {‘Dimensions’:

                            { ‘Key’: ‘LINKED_ACCOUNT’, ‘Values’:

[account_id]
        }}

      )

          TOTAL_COST = round(float(COST[‘ResultsByTime’][0][‘Total’][‘UnblendedCost’][‘Amount’]), 2)

               UNIT = COST[‘ResultsByTime’][0][‘Total’][‘UnblendedCost’][‘Unit’]

           SLACK_MESSAGE ={

                   “channel”: “#aws-cost”,

                    “username”: “AWS Cost Monitor”,

                   “text”: f”Your AWS account {account_id} due

{TOTAL_COST} {UNIT} on {START_DATE}.”,

                   “icon_emoji”: “:ghost:”,

}

                                       ENCODED_SLACK_MESSAGE         =

json.dumps(SLACK_MESSAGE).encode(‘utf-8’)

                                      SLACK_RESPONSE = requests.post (SLACK_WEBHOOK_URL, ENCODED_SLACK_MESSAGE)

                                      print(SLACK_RESPONSE.text)
Step 3:
- Now the final step is scheduling the Lambda automation every day. So, let’s do it.
- We need to create an EventBridge and point to the Lambda function to schedule the Lambda Automation.
- We need to create EventBridge and point to the Lambda function to schedule the Lambda Automation.
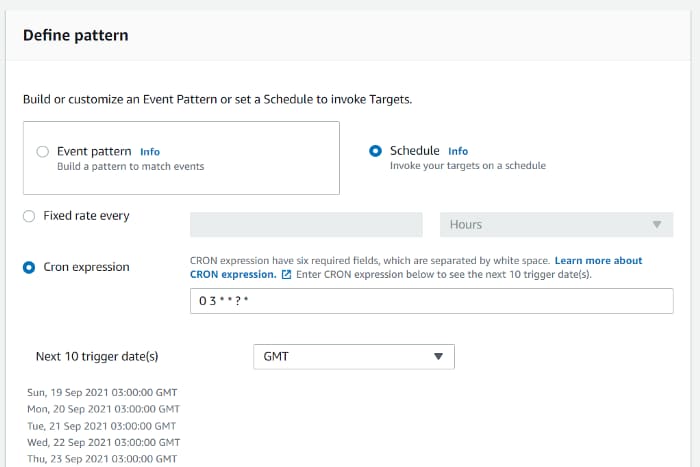
- Create the cron job by clicking the Schedule tab. The cron job should appear as it does below:
- This will trigger the Lambda every day at 3 AM UTC.
- Select Lambda as a target and click create button.
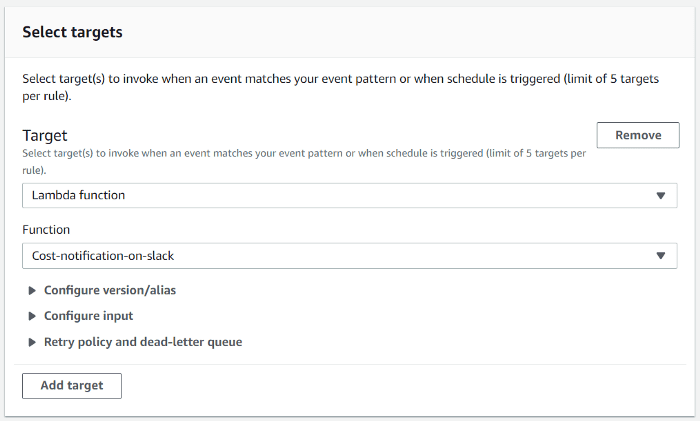
- Create the cron job by clicking the Schedule tab. The cron job should appear as it does below:

Now you will be able to receive notifications on your Slack account.
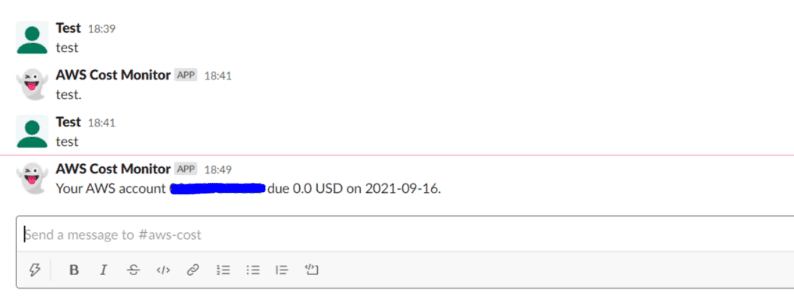
And that’s it – you just completed the AWS Cost monitor on Slack!

